If you're a regular follower of our weekly blog hops, can you believe we have now worked our way through Stampin' Up!'s entire colour range of 50 colours, one colour at a time?!
Every Wednesday night, we (a group of Stampin' Up! demonstrators from Australia) share cards or other papercraft projects made with one Stampin' Up! colour as the focus. We have this week reached, in alphabetical order, Tahitian Tide. This In Color is retiring at the end of April.
Hopefully you enjoy the blog hops as much as we participating do. Next week we start all over again, first with the new In Colors (and a new neutral in our range), then will work our way weekly through all the other Stampin' Up! colours in alphabetical order.
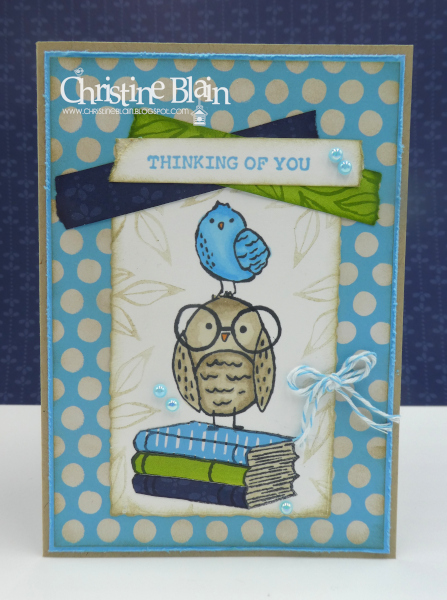
Here's the colour combination I have used on my Tahitian Tide card, featuring the cute Bird's Eye View stamp set:
Tahitian Tide is a very bright colour, and not one I have used very much. I toned down the polka-dot background by adding Crumb Cake ink, with a Blending Brush. The Tahitian Tide card layer behind the Designer Series Paper has been treated to some "roughing up around the edges" with Paper Snips held open (to run the blade along the card edge). I used to do this to my cards all the time, back in the day - it's a technique I'd kind of forgotten about.
The focal stamped piece on my card is Basic White, cut with a Deckled Rectangles Die.
I wanted the sentiment, and other, strips to look like tape holding down the focal panel. The sentiment is from the Hope You Know stamp set. I masked off (by adding washi tape to the stamp) the word "today", inked it up in Tahitian Tide ink, and removed the washi tape before stamping on Basic White card. I tore the ends of this strip of card, and sponged Crumb Cake ink around the edges. Behind the sentiment strip are two pieces of Designer Series Paper. The Granny Apple Green piece was cut from the Full of Life DSP, coming out on 1st May. I stamped leaves over it in Granny Apple Green ink, and sponged the edges in the same colour. The Night of Navy strip is a piece of Countryside Inn DSP, torn at the ends, and sponged with Night of Navy ink.
Tahitian Tide pearls were added to the sentiment strip.
The little bird, stamped in Memento Tuxedo black ink, was coloured with Tahitian Tide Stampin' Blends, with a touch of Dark Pumpkin Pie Stampin' Blends on the beak.
When stamping the main images on the Basic White piece of card, I first stamped the stack of books in Memento Tuxedo Black ink, then used the same ink to stamp both birds. They're photopolymer stamps, so easy to position.
I then stamped the books again on three separate pieces of Designer Series Paper - some Tahitian Tide DSP from the 2022-2024 In Color 6"x6" pack, a strip of Granny Apple Green paper from the upcoming Full of Life pack, and the same Night of Navy Countryside Inn paper used beneath my sentiment. Using Paper Snips, I cut out the book cover and spine from the Tahitian Tide piece, and the spines only from the other two, then glued them over the image I had stamped on the Basic White card. I used my Light Crumb Cake Stampin' Blends marker to colour the pages of the books.
The owl is also coloured with Crumb Cake Stampin' Blends, with Dark Pumpkin Pie used for the beak.
I used Crumb Cake ink to stamp leaves around the edges of the Deckled Rectangle Basic White piece. After inking the stamp each time, I stamped it onto scrap paper first, then added the lighter, second-generation, impression to the card. I "stamped off" each time I inked the leaves. Crumb Cake ink was sponged around the edges of the Deckled Rectangle.
Some more Tahitian Tide pearls, and a bow made from Tahitian Tide Baker's Twine, finish off the card front.
Here's how I decorated the inside of the card:
Next up on tonight's blog hop is Diane Furniss:
If you come across any broken links, or would like to see a comprehensive list of particpants in this week's blog hop, head over to
Catherine Proctor's blog. Cathy does a fantastic job of co-ordinating our weekly Colour Creations shares.
Listed below are all the current products I used to make my card. If you live in Australia, and would like to shop with me for your Stampin' Up! supplies, you can get to my online store by clicking on any of the thumbnail images below.
Next week we'll be back with the start of our new round of colours, starting with the gorgeous Peach Pie.
Product List

.png)


.JPG)


.png)


